Tuesday, September 30, 2014

How to redirect sudo output to a file requiring root permission

sudo is the recommended way to execute a command which requires root permission. In effect, the target command takes on the permission of root without having to provide the root password.

Consider the following scenario. In order to save the changes made to the iptables firewall rules, I need to run the following command which outputs the changes to a file with root permission.

$ sudo iptables-save > /etc/iptables/rules.v4 bash: /etc/iptables/rules.v4: Permission denied

Note that sudo responded with the Permission denied error. The problem was that the iptables-save command was run under sudo, but the output redirection to the /etc/iptables/rules.v4 file was handled by the shell and hence under the non-root user.

To overcome the problem, you can write a simple shell script and run the script using sudo like this:

$ cat > myscript.sh #!/bin/sh iptables-save > /etc/iptables/rules.v4 $ chmod +x myscript.sh $ sudo myscript.sh
If you don't want to write a script, the following are some alternatives.
  • $ sudo sh -c "iptables-save > /etc/iptables/rules.v4"
  • $ echo 'iptables-save > /etc/iptables/rules.v4' | sudo bash
  • $ sudo iptables-save|sudo tee /etc/iptables/rules.v4 >/dev/null

Tuesday, September 23, 2014

Upgrade from Fedora 19 to 20 using fedup

The recommended upgrade method for Fedora is to use the fedup tool. Below is my experience in following the fedup procedure to upgrade from Fedora 19 to 20. The upgrade was done over the Internet ("network upgrade") instead of from a local DVD media.

  1. Back up all important data in the system.
  2. Verify that the hard disk has sufficient disk space.

    Fedup first downloads the version 20 packages while the system is still running version 19. Therefore, the hard drive must have enough disk space to hold packages of both versions during the upgrade process. For my system, storing the version 20 packages requires about 2 GB.

  3. Perform a full system update under Fedora 19, and reboot to ensure that the system has the latest kernel changes.
    $ sudo yum update $ sudo reboot
  4. Install fedup client.

    The fedup client downloads over the Internet the boot image required to run the upgrade as well as the packages to be upgraded. It sets up the system to run the upgrade at the next boot.

    $ sudo yum install fedup
  5. Run fedup client.
    $ sudo fedup --network 20

    The above command downloads over the Internet (from the Fedora mirror system) all needed packages to upgrade to Fedora 20. It took almost an hour for my system to download everything. You should always verify that the install was successful by checking the fedup log file, /var/log/fedup.log.

    My first upgrade attempt appeared stalled towards the end of the download. So, I terminated the program with a Control-C. The fedup log file revealed a problem with downloading gnupg.

    [ 4130.971] (II) fedup.cli:start_meter() download gnupg-1.4.18-1.fc20.i686.rpm [ 4131.107] (II) fedup.yum:log_grab_failure() http://www.muug.mb.ca/pub/fedora/linux/updates/20/i386/gnupg-1.4.18-1.fc20.i686.rpm: [Errno 14] HTTP Error 416 - Requested Range Not Satisfiable

    I reran the command, and it went further than before but still failed with the error message Downloading failed: Didn't install any keys.

    The log file revealed that the offending key was RPM-GPG-KEY-rpmfusion-nonfree-fedora-20.

    [ 122.225] (--) fedup.yum:_retrievePublicKey() Retrieving key from file:///etc/pki/rpm-gpg/RPM-GPG-KEY-rpmfusion-nonfree-fedora-20 [ 122.266] (II) fedup.yum:_GPGKeyCheck() repo 'rpmfusion-nonfree' wants to import key /etc/pki/rpm-gpg/RPM-GPG-KEY-rpmfusion-nonfree-fedora-20 [ 122.267] (II) fedup.yum:check_keyfile() checking keyfile /etc/pki/rpm-gpg/RPM-GPG-KEY-rpmfusion-nonfree-fedora-20 [ 122.268] (DD) fedup.yum:check_keyfile() keyfile owned by package rpmfusion-nonfree-release-0:19-1 [ 122.271] (DD) fedup.yum:check_keyfile() package was signed with key cd30c86b [ 122.272] (II) fedup.yum:check_keyfile() REJECTED: key cd30c86b is not trusted by rpm [ 122.273] (II) fedup.yum:_GPGKeyCheck() no automatic trust for key %s [ 122.273] (II) fedup:message() Downloading failed: Didn't install any keys [ 122.274] (DD) fedup:<module<() Traceback (for debugging purposes):

    To solve the key problem, I manually imported the key using the following command:

    $ sudo rpmkeys --import /etc/pki/rpm-gpg/RPM-GPG-KEY-rpmfusion-nonfree-fedora-20

    Then, I ran the fedup command for the third time.

    $ fedup --network 20 setting up repos... No upgrade available for the following repos: fedora-chromium-stable getting boot images... .treeinfo.signed | 2.1 kB 00:00 setting up update... finding updates 100% [=========================================================] verify local files 100% [======================================================] testing upgrade transaction rpm transaction 100% [=========================================================] rpm install 100% [=============================================================] setting up system for upgrade Finished. Reboot to start upgrade. Packages without updates: .... NOTE: Some repos could not be contacted: fedora-chromium-stable If you start the upgrade now, packages from these repos will not be installed.

    The command completed with an informational message No upgrade available for the following repos: fedora-chromium-stable. The cause of the message is that Fedora 20 does not include Chromium in its official repository. I decided to ignore the message, and continued with the upgrade. As a result, Chromium will not be automatically upgraded. However, after the upgrade is finished, I can manually upgrade Chromium from an unofficial repository or install Google Chrome instead.

  6. Reboot the system.
    $ sudo reboot

    Note that a new entry, System Upgrade, is added to the GRUB menu. This is the default entry, and will be automatically selected. The actual upgrade took about 1 hour for my system.

    After the upgrade is complete, the system automatically reboots into Fedora 20.

  7. Login.

    Now that Fedora 20 is running, login and run the following command to display the version information.

    $ lsb_release -a LSB Version: :core-4.1-ia32:core-4.1-noarch Distributor ID: Fedora Description: Fedora release 20 (Heisenbug) Release: 20 Codename: Heisenbug
  8. Install Chrome.

    Instead of upgrading Chromium from an unofficial Fedora repository, I decided to switch to Chrome. Chrome is the free Google browser that is derived from the upstream Chromium project.

    To install Chrome:

    • Browse to the Google Chrome download site.
    • Select to download the appropriate 32 or 64-bit Fedora rpm.
    • Install the rpm

      I first used the rpm command to install the package. It failed because of a dependency problem.

      $ sudo rpm -i google-chrome-stable_current_i386.rpm warning: google-chrome-stable_current_i386.rpm: Header V4 DSA/SHA1 Signature, key ID 7fac5991: NOKEY error: Failed dependencies: lsb >= 4.0 is needed by google-chrome-stable-37.0.2062.120-1.i386

      To resolve the dependency automatically, I used the yum command as follows:

      $ sudo yum localinstall google-chrome-stable_current_i386.rpm

What was your experience in upgrading Fedora? Let us know by entering a comment.

Tuesday, September 16, 2014

How to optimize PNG images

My previous post introduces some tools to optimize JPEG images. The focus of this post is on optimizing PNG images. Two complimentary tools will be presented: optipng, and pngquant. The former, lossless, and the latter, lossy.

optipng

optipng optimizes a PNG file by compressing it losslessly.

The command to install optipng on Debian/Ubuntu is:

$ sudo apt-get install optipng

For Fedora/Centos/RedHat, execute:

$ sudo yum install optipng

To optimize a PNG file named input.png:

$ optipng -o7 -strip all -out out.png -clobber input.png

Notes:

  • Output PNG file.

    By default, optipng compresses the PNG file in-place, hence overwriting the original file. To write the output to a different file, use the -out option to specify a new output file. If the specified output file already exists, the -clobber option allows it to be overwritten. The -clobber is useful if you are running the command more than once.

    Alternatively, replace -out out.png with the -backup option. As a result, optipng first backs up the original input file before compressing the input file in-place.

  • Meta data.

    The -strip all option removes all meta data from the image.

  • Optimization level.

    The -o option specifies the optimization level, which ranges from 0 to 7. Level 7 offers the highest compression, but also takes the longest time to complete. It has been reported that there is a marginal return of improved compression as you increase the optimization level. The results obtained from my own 1-image test confirm that. The tests show that the default optimization level of 2 is pretty good, and that higher levels do not offer a big increase in compression.

    Optimization level Compression time
    (Seconds)
    File Size
    (Bytes)
    % Reduction
    Original N/A 285,420 N/A
    0 0.03 285,012 0.14
    1 3.07 242,548 15.02
    2 5.77 242,548 15.02
    3 10.33 242,175 15.15
    4 17.54 241,645 15.34
    5 34.61 241,258 15.47
    6 35.86 241,645 15.34
    7 71.37 241,258 15.47

pngquant

pngquant uses lossy compression techniques to reduce the size of a PNG image. It converts a 32-bit PNG image to a 8-bit paletted image. More specifically, instead of storing each pixel as a 4-channel, 32-bit RGBA value, each pixel is stored as an 8-bit reference for mapping to a color in a palette. This 8-bit color palette is embedded in the image, and is capable of defining 256 unique colors. The trick then becomes how to reduce the total number of colors in an image without sacrificing too much perceivable quality.

To install pngquant on Debian/Ubuntu:

$ sudo apt-get install pngquant

Note that the pngquant version shipped on Debian Wheezy is obsolete (1.0), and not recommended by the official pngquant web site. The examples below were run on version 2.0.0.

To install pngquant on Fedora/Centos/Redhat:

$ sudo yum install pngquant

To optimize a PNG image:

$ pngquant -o output.png --force --quality=70-80 input.png

Notes:

  • Specify the output image file name using the -o option. Without it, the default output name is the same as the input except that the extension is changed (for example, input-fs8.png).
  • Without the --force option, pngquant will not overwrite the output file if it already exists.
  • Since the introduction of the --quality=min-max option in version 1.8, the number of colors is automatically derived based on the specified min and max quality values. The min and max values range from 0 to 100, 100 being the highest quality.

    pngquant uses only the least number of colors required to meet or exceed the max quality level (80 in the above example). If it cannot achieve even the min quality value (70), the output image is not saved.

Below summarizes the results of optimizing one randomly chosen PNG image. It is not intended to be scientific or conclusive. Rather, I hope to give you an idea of the scale of reduction that is possible.

Quality
min-max
Orig 70-90% 70-80%
File Size
(Bytes)
1,281,420 445,464 376,221
% Reduction - 65.2 70.6

The 2 programs - optipng and pngquant - are not mutually exclusive. You will get the most compression from running pngquant. But if you want to get the last possible 1% or so compression, you may first run pngquant, then optipng.

$ pngquant -o lossy.png --force --quality=70-80 input.png $ optipng -o7 -strip all -out output.png lossy.png

Friday, September 12, 2014

How to optimize JPEG images

Poor load time degrades the user's experience of a web page. For a web page containing large images, optimizing images can significantly improve the load time performance which leads to better user experience. Moreover, if a web site is hosted on a cloud service which charges for cloud storage, compressing images can be financially worthwhile. This post explains the optimization of JPEG images using 2 command-line programs: jpegtran and jpegoptim. My next post introduces tools to optimize PNG images.

jpegtran

jpegtran optimizes a JPEG file losslessly. In other words, it reduces the file size without degrading the image quality. By specifying options, you can ask jpegtran to perform 3 types of lossless optimization:

  • -copy none

    An image file may contain metadata that are useless to you. For example, the following figure shows the embedded properties from a picture taken by a digital camera. Properties such as the Camera Brand and Camera Model can be safely stripped from the picture without affecting image quality.

  • -progressive

    There are two types of JPEG files: baseline and progressive. Most JPEG files downloaded from a digital camera or created using a graphics program are baseline. Web browsers render baseline JPEG images from top to bottom as the bytes are transmitted over the wire. In contrast, a progressive JPEG image is transmitted in multiple passes of progressively higher details. This enables the user to see an image preview before the entire image is displayed in its final resolution.

    For large JPEG images, converting from baseline to progressive encoding often results in smaller file size, and faster, user-perceived load time.

  • -optimize

    This option optimizes the Huffman tables embedded in a JPEG image.

To install jpegtran on Debian/Ubuntu:

$ sudo apt-get install libjpeg-progs

To install jpegtran on Fedora/Centos/RedHat:

$ sudo yum install libjpeg-turbo-utils

To optimize a JPG file:

$ jpegtran -copy none -progressive -optimize SAM_0297.JPG > opt_0297.JPG

Below are the results after running the above command.

File Size Before
(Bytes)
File Size After
(Bytes)
Reduction
(%)
3,119,056 2,860,568 8.3

jpegoptim

jpegoptim supports both lossless and lossy image optimization.

To install the program on Debian/Ubuntu:

$ sudo apt-get install jpegoptim

To install on Fedora/RedHat/Centos:

$ sudo yum install jpegoptim

To specify the same 3 types of lossless optimization as explained above, execute this command:

$ jpegoptim --strip-all --all-progressive --dest=opt SAM_0297.JPG SAM_0297.JPG 4000x3000 24bit N Exiff [OK] 3119056 --> 2860568 bytes (8.29%), optimized.

Notes:

  • The --all-progressive option is a feature introduced in jpegoptim version 1.3.0. The version on Debian Wheezy is only 1.2.3, therefore the option is not available.
  • By default, jpegoptim compresses in place, overwriting the input JPEG image. If you don't want the program to write over the input file, specify an alternative directory using the --dest option.

jpegoptim can also compress an image file using lossy optimization techniques. Specify an image quality from 0 to 100, with 100 being the highest quality (and lowest compression). To compress with 90% image quality, execute:

$ jpegoptim --max=90 --dest=opt SAM_0297.JPG SAM_0297.JPG 4000x3000 24bit Exif [OK] 3119056 --> 2337388 bytes (25.06%), optimized.

The table below summarizes the % of reduction in file size as you decrease the image quality. There is a trade-off between file size and image quality. While reducing image size is a worthwhile goal, you don't want to end up with an image that is not "pretty" enough. You are the final judge of the lowest quality that is acceptable to you. To pick the image quality to use for a specific picture, experiment by incrementally decreasing the image quality (say by 10 each time), visually inspect the output image, and stop when the image quality is no longer acceptable.

Quality 100% 90% 80%
File Size
(Bytes)
3,119,056 2,337,388 1,356,131
% Reduction - 25.0 56.5

Tuesday, September 2, 2014

Create video screencasts using recordmydesktop

Why make a video screen capture, aka screencast? Some possible reasons are:

  • Create a software demo.
  • Capture a video game session for playback later.
  • Keep a record of what transpires on the computer screen.

I create screencasts mainly for recordkeeping. As a result, I don't expect to edit the output video, for example, to obfuscate sensitive data, or to insert call-outs to draw attention to specific screen areas.

The tool I use is the command-line program recordmydesktop. It is a basic, no-frills screencasting program which offers video and audio capture but no editing features.

To install recordmydesktop on Debian/Ubuntu:

$ sudo apt-get install recordmydesktop

Record entire screen

$ recordmydesktop --no-sound --delay 5 -o myfile.ogv

Notes on command options:

  1. --no-sound is specified because I don't want to record a soundtrack for the video.
  2. With --delay 5, actual recording is delayed for 5 seconds after the command is run. This short delay gives you time to properly setup the screen before recording starts. For example, you may want to minimize the window in which you execute recordmydesktop.
  3. By default, the output file is named out.ogv. You can change the file name using the -o option, but the file extension must be ogv. recordmydesktop only outputs ogv video files. If you want to upload the output video to YouTube, use a video converter to convert from ogv to one of the YouTube supported video formats - e.g., avi.

To stop the recording, press the Control-Alt-s keys. This action automatically starts the encoding process. Depending on the length of the video, encoding can take a while to complete. After you stop the recording, you cannot resume recording the screen.

To temporarily pause the recording, press Control-Alt-p. You can resume recording by pressing the same keystrokes again.

Record a region

$ recordmydesktop --fps 15 --width 1038 --height 777 -x 88 -y 96 --no-sound --delay 5 -o myfile.ogv

--fps specifies the frame rate, the number of frames to capture per second. To avoid choppy videos, use a sufficiently high frame rate. 15 fps is in general good enough.

To capture a rectangular region on the screen, you need to explicitly specify its location and dimensions. The --x and --y options define the offsets in number of pixels from the upper left corner of the screen. The --width and --height options specify the dimensions of the region in number of pixels.

To help you determine the offsets and the dimensions, use the xwininfo command.

  1. Open the target window.

    If the region you want to capture is an existing window (say a browser window), simply open the window.

    Otherwise, open a new window, say a bash terminal. Re-size the terminal window to have the same size as the capture region. Relocate the window to the capture region on the screen.

  2. Run xwininfo without any argument.
  3. Click inside the target window.
  4. Look for the following fields in the command output:
    $ xwininfo ... Absolute upper-left X: 88 Absolute upper-left Y: 96 ... Width: 1038 Height: 777 ...

GUI screencast programs

If you prefer a GUI-based app, you may use gtk-recordmydesktop (a front-end for recordmydesktop), or kazam.

gtk-recordmydesktop can be installed like this:

$ apt-get install gtk-recordmydesktop

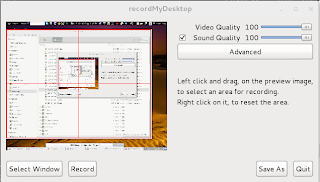
With the GUI front-end, you no longer need to manually calculate the dimensions, or the x and y offsets of the capture region. Instead, simply click and drag to define a rectangular region.

In summary, recordmydesktop is a nifty screencasting tool which allows you to video-capture your screen with or without sound. However, it does not have the editing features to add text call-outs or obfuscate sensitive screen contents - features which are critical for creating video tutorials. If you are aware of a video capture tool that does both recording and editing, please make a comment.